Thursday, December 16, 2010

Unique Rudolph - Work of Art

This piece of holiday art will fit in an 11x14 frame.  Perfect to take out each Christmas to see your child's sweet little antler hands and fingerprints as the "Christmas lights" on the matte.
Cut a piece of green paper to 8x10. Rudolph is made from a brown triangle, 2 medium white and 2 small black circles for the eyes and one red circle nose.  Once glued on the bottom of the page, paint each hand brown for the antlers.

Footprints with 3 month old Isla!
  For the matte, I bought an 11x14 cream colored matte from Wal Mart found in the picture frame section.  Use Elmer's glue to make a wavy line go around the matte.  Place green yarn onto the glue to create the "string" for the lights.  The kids use their fingertips dipped in red and green paint to make the "Christmas lights".  They all turned out so cute and were so proud of their art!  Merry Christmas!!!

Wednesday, December 15, 2010

Edible Christmas Trees

These trees are fun to make and delicious for kids of all ages!  Supplies needed: white icing, green food coloring, cone shaped ice cream cones, small candies to decorate as ornaments, coconut and animal crackers.
Mix the white icing with a few drops of the green food coloring.  Put some icing on child's paper plate and place the cone upside down in the icing.  Now your kids can start decorating.   Use a plastic knife or popsicle stick to spread the icing all over the ice cream cone.  Then press the small candies all around the green tree.  Sprinkle coconut to look like snow.  Finally, place animal cookies around the plate using icing to hold them up.
Look at those smiles!  This is also a great activity to do at the park as a holiday get-together.  You can have your guests bring one wrapped Christmas book and do a book gift exchange.  Don't forget to bring coffee for the moms!

Sunday, December 12, 2010

Painted Marble Candycane

 Kids love this and it always turns out!  You need a few things for this project:
a shoebox, construction paper cut in the shape of a canycane or any Christmas shape that fits inside the shoebox, paint, marbles, and plastic spoons.
Place the paper inside the shoebox.  Dip one marble into a small cup of paint.  Use the plastic spoon to pick up the marble and drop into the shoebox. This keeps fingers clean and kids like tying to pick up the marble. Repeat this for each color of paint you are using.  Once the marbles are in the shoebox tip the box back and forth so that the marbles move around the box making tracks.

Wednesday, December 8, 2010

Santa Handprint

Santa Handprint

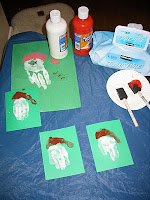
Santa Handprint:  This can be a card to send to grandma or use as an ornament.  It is so cute and easy to make a bunch at one time.  All you need is white and red paint.  Using a sponge paint brush paint the fingers and palm white (Santa's beard and face) and the thumb and top of the hand red (Santa's hat).  Press your child's hand onto green paper.  Try to have the fingers stay together and stretch the thumb out.  You just have to reapply/touch-up the paint to the hand to make more.  Once it dries you can add the face with marker and a cotton ball to the end of Santa's hat.
*Some kids may not want their hand painted.  Tell them you are going to "tickle" their hand or let them feel the paint brush on their hand before you add the paint.
If you decide to make it into an ornament, this is a cute poem to attach to the back:
When you hang this ornament
From year to year,
I hope it brings you a smile
From ear to ear
This handprint Santa will
Help you to remember,
How small I was in 2010 -
In the month of December. 


Stay tuned for more Holiday crafts...