Thursday, December 16, 2010

Unique Rudolph - Work of Art

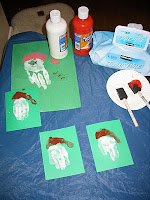
This piece of holiday art will fit in an 11x14 frame.  Perfect to take out each Christmas to see your child's sweet little antler hands and fingerprints as the "Christmas lights" on the matte.
Cut a piece of green paper to 8x10. Rudolph is made from a brown triangle, 2 medium white and 2 small black circles for the eyes and one red circle nose.  Once glued on the bottom of the page, paint each hand brown for the antlers.

Footprints with 3 month old Isla!
  For the matte, I bought an 11x14 cream colored matte from Wal Mart found in the picture frame section.  Use Elmer's glue to make a wavy line go around the matte.  Place green yarn onto the glue to create the "string" for the lights.  The kids use their fingertips dipped in red and green paint to make the "Christmas lights".  They all turned out so cute and were so proud of their art!  Merry Christmas!!!

Wednesday, December 15, 2010

Edible Christmas Trees

These trees are fun to make and delicious for kids of all ages!  Supplies needed: white icing, green food coloring, cone shaped ice cream cones, small candies to decorate as ornaments, coconut and animal crackers.
Mix the white icing with a few drops of the green food coloring.  Put some icing on child's paper plate and place the cone upside down in the icing.  Now your kids can start decorating.   Use a plastic knife or popsicle stick to spread the icing all over the ice cream cone.  Then press the small candies all around the green tree.  Sprinkle coconut to look like snow.  Finally, place animal cookies around the plate using icing to hold them up.
Look at those smiles!  This is also a great activity to do at the park as a holiday get-together.  You can have your guests bring one wrapped Christmas book and do a book gift exchange.  Don't forget to bring coffee for the moms!

Sunday, December 12, 2010

Painted Marble Candycane

 Kids love this and it always turns out!  You need a few things for this project:
a shoebox, construction paper cut in the shape of a canycane or any Christmas shape that fits inside the shoebox, paint, marbles, and plastic spoons.
Place the paper inside the shoebox.  Dip one marble into a small cup of paint.  Use the plastic spoon to pick up the marble and drop into the shoebox. This keeps fingers clean and kids like tying to pick up the marble. Repeat this for each color of paint you are using.  Once the marbles are in the shoebox tip the box back and forth so that the marbles move around the box making tracks.

Wednesday, December 8, 2010

Santa Handprint

Santa Handprint

Santa Handprint:  This can be a card to send to grandma or use as an ornament.  It is so cute and easy to make a bunch at one time.  All you need is white and red paint.  Using a sponge paint brush paint the fingers and palm white (Santa's beard and face) and the thumb and top of the hand red (Santa's hat).  Press your child's hand onto green paper.  Try to have the fingers stay together and stretch the thumb out.  You just have to reapply/touch-up the paint to the hand to make more.  Once it dries you can add the face with marker and a cotton ball to the end of Santa's hat.
*Some kids may not want their hand painted.  Tell them you are going to "tickle" their hand or let them feel the paint brush on their hand before you add the paint.
If you decide to make it into an ornament, this is a cute poem to attach to the back:
When you hang this ornament
From year to year,
I hope it brings you a smile
From ear to ear
This handprint Santa will
Help you to remember,
How small I was in 2010 -
In the month of December. 


Stay tuned for more Holiday crafts...

Monday, November 22, 2010

THANKFUL Tree

Our THANKSgiving Tree
We went over to my parents house for dinner tonight for an "early" Thanksgiving.    The kids made a "THANKFUL" Tree to give to grandma and grandpa. I brought over a small olive branch that I stuck into a cup filled with rocks.  We used Fiskar scissors with the different cutting blades and Fall colored construction paper.  I drew a basic leaf shape and they cut out them out.  Then, they colored pictures of things they were "thankful" for, such as Rocky (our dog), family, papa, etc.  The oldest sounded out the words and I wrote the words for the younger kids.  They hole punched the paper leaf and pushed a thin ribbon through the hole.  I tied a knot and they hung their leaf on the "Thankful" tree.  They were so proud of their tree.
*This would be a great activity to do Thanksgiving Day when all the family is together.  Everyone could make a leaf to put on the tree (even the adults!)  It is also a great way to keep the kids busy that day.  Wishing you a blessed and happy Thanksgiving Day!

Monday, November 15, 2010

Turkey Time

Here are a couple of my favorite turkey projects.  1.  The turkey hand print is a must.  Paint the palm and thumb brown and the remaining fingers different colors. (use whatever colors you have at home) We sure to use washable paint and have wet wipes handy.  2.  The paper turkey.  When the project is complete, write things that they are thankful for, like the dog, mommy, daddy, etc! 
Happy Thanksgiving!

Nuts About You!

Brown squirrel, brown squirrel, swish your bushy tail is one of our favorite Fall songs.  Have had fun singing and acting out this silly song with the squirrel.  Cut out a brown squirrel body and a big bushy tail.   Paint glue on the tail using a paint brush or sponge brush and crumple up small pieces of brown tissue paper to put on the glue to make the tail look "bushy."  Glue an acorn on the body and added a face with crayon.  Once dried, attach the body to the tail with a brad so that the tail could move back and forth as you sing the song.  

Just a thought:  I was trying to think of a little something we could bring my son's teacher for Thanksgiving.  So...we made another brown squirrel and wrote, "I'm Nuts About You!" on the acorn.  We brought her a yummy bag of nuts from Trader Joes.  

New favorite Fall Book:  One More Acorn by Don and Roy Freeman, author of Corduroy
Brown Squirrel Lyrics
Brown squirrel, brown squirrel swish your bushy tail 
(action-swish your bottom from side to side)
Brown squirrel, brown squirrel swish your bushy tail 
(action-swish your bottom from side to side)
Wrinkle up your little nose, Crack a nut between your toes
Brown squirrel, brown squirrel swish your bushy tail 
(action-swish your bottom from side to side)
Brown squirrel, brown squirrel swish your bushy tail 
(action-swish your bottom from side to side)

Tuesday, October 19, 2010

Itsy Bitsy Spider

Everyone loves the song, The Itsy Bitsy Spider so here is a simple craft you can do with your child that also teaches shapes and colors.  Pre-cut a square, triangle, rectangle and circle.  The kids glue down the shapes to create the house.   Add rain and grass with crayon.  Then put a spider ring on a straw and tape it to the house for the "water spout".  Have fun singing the song and moving the spider up and down the water spout.
The itsy-bitsy spider
Climbed up the water spout
Down came the rain
And washed the spider out
Out came the sun
And dried up all the rain
And the itsy-bitsy spider
Climbed up the spout again.

Adorable Ghosts

This is one of my favorite Halloween crafts.  You can make cards to send to grandma or  trick or treat bags using your hands or feet.  All you need is white washable paint and a paint brush. Paint your child's hand or foot and place on your paper. (Make sure you have your handy wipes near by!)  When the paint dries you can add detail using a black permanent pen.  I have done this every year with my son.  It is fun to see how much he has grown each year!
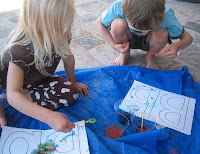
Happy Halloween!

Wednesday, October 6, 2010

Pumpkins, pumpkins

It seems like everywhere you go, there are pumpkins.  We already have 3, one small, one medium and one that is two toned.  It is only the beginning of October!  I love seeing the variety of pumpkins.  I don't remember so many to choose from when I was a little girl.
We are painting and singing about pumpkins.  Today I cut out a white pumpkin shape and my son painted it using a piece of sponge clipped onto a clothes pin.  He dabbed the pumpkin with orange paint.  When he finished, we added a green stem and used some green curling ribbon for the vine.

Here are a few of our favorite pumpkin songs poems.  Enjoy!

Pumpkin Faces (poem)  
Kids love making the faces. Try saying this in front of a mirror.
This is pumpkin happy.  This is pumpkin sad.
This is pumpkin sleepy.  This is pumpkin mad.
Cut them up is pieces small, in pumpkin pie they are best of all!
*extension activity:  cut out 4 pumpkins and have your child decorate the faces to match the emotion.

Five Little Pumpkins (poem)
5 little pumpkins sitting on a gate
The first one said, "Oh my, it is getting late."
The second one said, "There are witches in the air.
The third one said, "Oh pooh, I don't care."
The fourth one said, "We'd better run, run, run!"
The fifth one said, "Isn't Halloween fun!"
Then Wooooooo went the wind
And OUT (clap) went the lights
And the five little pumpkins rolled out of sight.

Ten Little Pumpkins
One little, two little, three little pumpkins,
Four little, five little, six little pumpkins,
Seven little, eight little, nine little pumpkins,
Ten little pumpkins all shout, BOOOOOO!
Sing again counting backwards from ten to one.  The last pumpkin will whisper, "Boo!"
*extension activity:  cut out ten pumpkins and write the numbers on them.  Have your child put them in order.

Wednesday, September 22, 2010

FALL is Here

Summer is over, Now it's Fall.  
Just the nicest Season of all!

I love this time of year!  There are so many exciting things to do and places to go with your kids.  Today we painted a construction paper leaf shape using the colors of Fall: red, yellow, and orange.  (I didn't use brown, but we talked about brown, crunchy leaves.)  I also took another paper leaf and painted my son's hand using the leftover paint.  Just an excuse to see my child's sweet little handprint!
STAY TUNED FOR MANY MORE FUN FALL ACTIVITIES....

Sunday, August 29, 2010

Playing with Playdough


Moms, it is so easy to make playdough!  The recipe below took no more that 15 minutes to make and now we have HOURS of playdough fun!  (FYI - double the recipe if you have enough ingredients.)
My son enjoys "cutting" the playdough with his plastic knife.  I took out random length straws and he stuck them in all over.  This particular creation is a cake with candles that need to be blown out and it includes a straw to drink juice.  It looks like our dog is taking a sip. 

COOKED PLAY DOUGH
1 cup flour
1 cup water
1Tbsp. Oil
½ cup salt
1 tsp. Cream of Tartar
Food coloring, colors for cake icing and scents added as desired.
Add the colors and scents to the water.

Mix all ingredients together in a sauce pan.  Cook over medium heat until mixture
pulls away from sides of the pan and becomes play dough consistency.

Kneed until cool.  Store in an air-tight container.
*thank you Luciana for this easy recipe!*

Wednesday, August 25, 2010

Last Minute Review

School starts in a few days and parents are afraid their children have forgotten EVERYTHING over the summer!  No fear, check out these easy, fun ways to review.

ABC Match:
Write the alphabet in CAPITAL letters on a large piece of construction paper.  Write the lower case letters on post-it notes.  Place the lower case letters out of order on the wall.  Have your child put the lower case letters on top of the CAPITAL letters.

Stick Writing:
Kids love using colored popsicle craft sticks to practice making letters, sight words, name, or creating fun designs.

Do-A-Dot Art Markers:
Another great way to practice name writing or sight words.  Kids can "dot" out words, names, numbers, etc...

Countdown to School!

Here are a few fun ideas you can do at home to prepare for that first day of school!
1.  Make a "Countdown" road to school with your child.  Find out how many days are left before school starts.  You can write or print out numbers and have your child glue them in order from the biggest number down to number one.  Draw a line to connect the numbers to make your path.  At the end of the "path" have your child draw a picture of their school.  Take a post-it note and put in on the biggest number.  Each day, have your child move the post-it note one number until you reach the FIRST DAY OF SCHOOL!


It will be a great year! 

Monday, August 16, 2010

Confetti Fish

I love all the fun ways you can decorate fish.  We read A Fishy Shape Story by Joanne & David Wylie, which teaches all the shapes.  Each fish in the book is made from a different shape.  The last page is a picture of a "confetti" fish which is made up of all the shapes.
I cut out a shape of a fish (you can let your child cut out if age-appropriate).  I had a pile of small shapes cut out from different colors of construction paper. The kids glued the shapes on the fish.  When they were done we added stripes of tissue paper on the tail. 
The kids had fun "swimming" their colorful confetti fish around the room.  The kids acted out the adorable story Ten Little Fish by Audrey Wood as I read it aloud.  This is a great story for rhyming, counting and great illustrations!

When you hang the confetti fish up in your house it is a great way to continue to review the names of shapes.  Have your child point out a circle or triangle on the fish.  Ask them, "Do you have more squares or stars on your fish?" etc...
It is a fun, simple, and educational way to have fun with art!
Unfortunately I was unable to find, A Fishy Shape Story on Amazon.  It must be out of print!  Thanks mom for holding onto this book all these years!

Thursday, August 5, 2010

Ease Those First Day Jitters

Excitement and anxiety are only a few emotions that are present when you and your child prepare for their FIRST DAY OF SCHOOL!
I will be offering a two hour workshop for children entering Kindergarten and First Grade to help ease those first day jitters!

Kindergarten Countdown:  August 24, 9:00-11:00
We will be reading stories, like Miss Bindergarten Gets Ready for Kindergarten, playing games that encourage name recognition, letters, sounds, and numbers.  We will be discussing what to expect and get excited about starting their first day of Kindergarten and learning!

First Grade Countdown: August 24, 1:00-3:00
We will be playing games to review Kindergarten skills such as sight words, letters, sounds, numbers and basic addition and subtraction.  We will be talking about what to expect and reading stories to get them excited about their FIRST day of First Grade!

*Location: Talega Swim and Athletic Club
*Cost: $30

*Registration forms can be picked up at the Talega Swim and Athletic Club or emailed to you directly at dcodaniels@gmail.com


Wednesday, August 4, 2010

Rainbow Fish


We have been reading and enjoying the many Rainbow Fish and Friends stories by Marcus Pfister.  Today my boys decorated their own rainbow fish.  I cut out a fish shape and they used Do-A-Dot Art markers to color the fish.  If you have not used these markers, they are fun and easy to use.   I got them at Lakeshore Teaching Supply or can be ordered online.  These markers are perfect for children to "dot" out letters, numbers or shapes.  It is a great way to practice pre-writing skills.


Friday, July 30, 2010

Water Painting

Did you do anything today with your child that you want to share?
I spent about 30 minutes in the backyard with my son water painting!  We had a bucket full of water and some paint brushes and paint sponges.  We painted the bricks on the ground.  We talked about why the bricks in the sun dried quicker than the ones in the shade.  Then my son moved on to painting others things, like his cars, trains, chairs...It was a fun, cool way to spend the afternoon!

Monday, July 19, 2010

B is for BUBBLES Part 2


After making the bubble art, we played a bubble game using the song, Ten Little Bubbles.  I did this in my class and the kids LOVED it!
I cut out ten circles from construction paper, all different colors and different sizes.  The kids had to put the 10 "colored bubbles" in order from smallest to biggest.  We taped them to the wall to see the bubbles getting bigger.  Then as we counted them I wrote the number on the bubble.  Then we sang our song, Ten Little Bubbles.  We sang the song from one to ten and then counted backwards from ten to one.  I passed out a small, soft squishy ball to each child.  As we sang the second verse over and over again, "Pop those, pop those, pop those bubbles" the kids had to throw their ball and try and hit the bubbles on the wall.  They we squealing with excitement.  While they were throwing the balls, I would  say, "pop the red bubble" or "pop the biggest bubble" or "who can pop bubble with the number two on it?".  It was fun!!!

B is for BUBBLES


Everyone loves bubbles, even our dog.  Our family spends a lot of time in the backyard blowing bubbles.  Today we poured bubble solution in 3 plastic cups and put about 8 drops of food coloring into each cup, one red, one blue, and one yellow.  We stirred it around then blew colored bubbles onto white paper. 
Extension Activity:  Talk about the primary colors (red, yellow, and blue) and then find out what would happen if you pour the blue bubble solution into the red cup???  Pour the yellow into the blue or the yellow into the red?  Kids love exploring with color and are excited to create new colors.
We had fun singing this bubble song...the second verse gets exciting!

Ten Little Bubbles 
Tune: "Ten Little Indians"

One little, two little, three little bubbles.
Four little, five little, six little bubbles.
Seven little, eight little, nine little bubbles.
Ten bubbles floating to the ground.


Pop those, pop those, pop those bubbles. 
Ten little bubbles go POP! POP! POP!


Tuesday, July 6, 2010

mini environment


It is July 5 in "sunny" San Clemente and you'd think we would be at the pool or the beach...think again!  The sun has not appeared and we are all in pants and sweatshirts.
What to do today????  I decided to make a trip to the store for a small clear bin with a lid and some small plastic animals.  I found dinosaurs.  On the way home I scooped up some sand from the park for my bin.  Then, my son and I assembled our dinosaur environment.   Shay loved paying with his mini sandbox!  He was making dinosaur sounds as he played.  Some were "hiding" under the rocks and shells and others were "eating" the trees.  What a great way to build vocabulary and creative play.  The best part was that when he was done playing, I put on the lid and stored it in the garage for another day.  I figure in the future I can find other animals to create different environments and put in in the backyard when the sun finally decides to shine!
This was well worth the $6.00 investment!

Wednesday, June 9, 2010

Letter Hunt

Why wait for the Easter Bunny to go on a HUNT?
Today we went on a letter hunt.  I printed the letters of the alphabet and cut them apart.  I spread them out all over the grass.  Each child had their own bag and had to collect letters.  They put the letters in ABC order and practiced saying the letter names and sounds.

Hunt Variations: sight words, numbers (put them in order), upper case and lower case letters (match the letters), pictures of rhyming words

We also made special letter spotter binoculars to help find the letters. The kids decorated their binoculars with letter stickers.   For directions click here: http://mrsodaniels.blogspot.com/2010/05/treasure-found.html


It was so fun to see the kids run around the grass collecting their letters as they used their binoculars!

Friday, June 4, 2010

Summer Fun

MOMMY and ME  and Move and Groove Through the Alphabet (Pre-K) classes begin July 7 at the Talega Clubhouse.  For more information click on the link below

http://mrsodaniels.blogspot.com/2010/05/summer-schedule.html

For students going into Kindergarten or First Grade I will be offering a 2 hour workshop on August 24 at the Talega Clubhouse to get them excited about starting school.

Kindergarten -  9:00-11:00  We will be playing games that focus on letters, sounds, numbers, rhyme and name recognition.  We will reading stories about starting Kindergarten and talk about what to expect that first day!

First Grade - 1:00-3:00  We will be playing games that focus on sight words, letters, sounds and number recognition to 100.  It will be a fun way to review what they learned in Kindergarten.  We will discuss what to expect on their first day of school.
Email me for more information or a registration form
dcodaniels@gmail.com

Tuesday, June 1, 2010

Choo Choo Tracks

It seems like all day, every day I hear some sort of train, plane or automobile sound coming from my two year old.  Today we made some "tracks" from some of his trains and trucks using paint.
You need: paper, paint, old trains or trucks and a safe area to paint.   I recommend using toys that have wide wheels or have some tread.  The 99 Cent Store has a great collection. I used some of my veggie containers from the store to hold the paint.
Directions: Pour paint into containers and watch your child have fun pushing their train in the paint and then onto their paper.  My son really got into his art project.  He was saying "Choo, Choo" as the tracks appeared.
For kids who are older, try writing the letter "T" on the paper first and review the sound.  As they are going over their paper they can make the "T" sound as they make their "tracks" with their "train".
Here is a song we like to sing. 
Clickety clickety clickety clack
Hear the train coming down the track
Chug chug chug
And up the hill it climbs
Listen to the whistle
 blow (4) times
Choo, Choo, Choo, Choo (changes depending on the number you use)

Sunday, May 23, 2010

Treasure Found

Looking for something exciting to do outside...go on a treasure hunt.
First you need special binoculars and they are easy to make: take two empty toilet paper rolls and staple them together (side by side).  Then punch two holes on the sides and put string through.  Have your child decorate them while you make your list of items to find on your hunt.

I created a list of items to "LOOK FOR" and items they can "TOUCH" to put in their bags.  This is a great way to develop vocabulary and become more aware of their surroundings.  Be sure to have them use their special binoculars!

"LOOK" items can include: birds, clouds, bugs, flower, water...

"TOUCH" items they can collect to put into their bags.  Some ideas: a big leaf, a small rock, blade of grass, pinch of sand...
 While out on the search, try using other senses too.  Ask your child: "Do you hear the birds? Can you smell the flowers?"  Kids love looking for treasure.  After the hunt your child will love to look at all the items they collected in their bag.

Tuesday, May 11, 2010

Summer Schedule

It is hard to believe that Summer will be here soon!  I will be offering classes on Wednesday mornings at the Talega Club House in San Clemente.

Kindergarten Readiness: Move and Groove Through the Alphabet will focus on skills needed to prepare your child for school.  Letters, sounds, rhyme, and numbers are taught through music, games, and art.

Session One: July 7 - July 28  9:00-9:50 am
Session Two: August 4 - August 25 9:00-9:50 am

Mommy and Me:  Children 18 months to 3 years of age will sing, dance, play and explore the fun themes of summer with their parent.

Session One: July 7 - July 28 10:00-10:50 am
Session Two: August 4 - August 25 10:00-10:50 am

Cost: $60 per session or $105 for two 

Class Maximum is 10 students per class.  Reserve your spot today!

Registration forms can be picked up at the Talega Club House or emailed to you.
Email me your request at:
dcodaniels@gmail.com

Friday, May 7, 2010

Worm Wonders

It is always exciting when a child first discovers their first worm.  Some children might stand back and observe the tiny creature or others might get right in there and pick it up.  Hopefully after their first encounter, the worm will survive!
There are lots of fun things to do with worms.  
OBSERVE: They are best found where dirt is damp.  Have your child stir up some dirt and see if any worms appear.  It is important to teach your children to be gentle to the worms and not to hurt or squash them.  Magnifying glasses are fun to use to see them up close.
ART: I've never tried this, but you can put a small blog of non-toxic paint on a piece of paper and place a worm on the paint.  As the worms crawls, you can see their path.  Rinse off the worms with cool water before putting them back in the dirt!  OR you can put a strand of cooked spaghetti in some paint and put that on paper to create worm trails.  We will be doing this in class.  If you decide to try the paint on a real worm, please let me know what happens!
MUSIC AND MOVEMENT:  Put a piper cleaner around your child's finger to create a worm and use it to act out worm songs.  Here are a few of my favorites.

Little Wiggle Worm Song
Sung to: "I'm a Little Teapot"

I'm a little wiggle worm, watch me go!
I can wiggle fast, or very very slow.
I wiggle all around, then back I go
Down into the ground, to the home I know.

LITTLE WIGGLE WORM
 Tune:  "The Eensy-Weensy Spider"

 The little wiggle worm                      
 Went crawling underground.            
 Down came the rain;                       
 Soon mud was all around.                

 Rain filled the tunnels                       
 And pushed out the little worm.         
 So the puddles on the ground            
 Were the only place to squirm.          
 
Catching Bugs
Sung to: "Mary had a little lamb"
Catch some bugs, and look at them,
Look at them, look at them.
Catch some bugs and look at them,
Then PLEASE let them go.

PHONICS:  This is a great time to introduce the letter "w" and the sound.  Everytime you see a "W" you can wiggle like a worm and say the sound,   "/w/, /w/, /w/  as in worm."  The kids will never forget exploring worms.

Have fun playing with worms...your child will thank you!