Stick a toothpick through a gumdrop for the arms and two toothpicks at the bottom for the legs. Pre-cut licorice to put on the toothpicks for the arms and legs. Stick the bottom toothpicks into Kit Kats for the skis. Attach mini marshmallows to the gumdrop with icing and Hershey's Kiss for the hat. Each child got an ice cream cone to make a snow-covered tree.
Showing posts with label Winter. Show all posts
Friday, December 19, 2014
Edible Winter Scene
This edible winter scene was a hit for the first-grade winter party. Thank you In and Out Burger for giving us the cardboard trays to hold their treasures.
Stick a toothpick through a gumdrop for the arms and two toothpicks at the bottom for the legs. Pre-cut licorice to put on the toothpicks for the arms and legs. Stick the bottom toothpicks into Kit Kats for the skis. Attach mini marshmallows to the gumdrop with icing and Hershey's Kiss for the hat. Each child got an ice cream cone to make a snow-covered tree.
Monday, December 8, 2014
Pine Cone Christmas Tree
Not only are these fun to make, but they smell amazing! I got the cinnamon-scented pine cones at Michael's. The kids loved smelling them and they left the room smelling good too!!
Supplies; pinecones, glue, paint, and decorations to attach. Anything would work. I used pom-poms, sequins, and glitter. Have fun!
Friday, November 28, 2014
December Prep
Thanksgiving is over and now it is time to get ready for some December fun. I spent this Black Friday wrapping up our Christmas books, and even a few Hunakkah ones. I've always wanted to do this and being a teacher, I have plenty of holiday books. So the plan is, that each day in December, my boys will unwrap a book or two to read together. My son always looks forward to our December book collection and thought this would build to the excitement of the holidays.
If you are in search of some Christmas/winter books, head to your local library's bookstore. You can purchase books for $.50 - 1.00! TJ Max has a good selection of books too, for a discount. Another fun way to add to your collection is to have a holiday book exchange with your friends.
What are some of your favorite holiday books??? Here are only a few of our family favorites!! Cozy up this time of year with your kids and enjoy some great books together!
Mommy and Me Holiday Express starts Monday, December 7!!! Register today:
If you are in search of some Christmas/winter books, head to your local library's bookstore. You can purchase books for $.50 - 1.00! TJ Max has a good selection of books too, for a discount. Another fun way to add to your collection is to have a holiday book exchange with your friends.
What are some of your favorite holiday books??? Here are only a few of our family favorites!! Cozy up this time of year with your kids and enjoy some great books together!
Mommy and Me Holiday Express starts Monday, December 7!!! Register today:
http://mrsodaniels.blogspot.com/2014/11/holiday-express-mommy-and-me.html?m=1
Wednesday, February 26, 2014
Ice Skating in Lamorinda!
This week we continued our winter celebration as we ice skated to some beautiful music. Moms and little ones had fun skating and twirling together! We even had a snowball fight without getting cold hands! Next week we will begin looking for signs of Spring. Join us for our next session beginning April 14 at the Lamorinda Theater Academy.
Thursday, January 9, 2014
Winter Wonderland Session beginning February 3!!!
Mommy and Me Mondays will begin again on February 3, 2014! Are you signed up???
This is always a fun time of year for the little ones as we will be exploring themes such as snowmen, friendship, Valentine's Day, penguins, colors of the rainbow and begin looking for signs of Spring in March!!!!Each class begins with a simple 8x8 size craft that fits into a scrapbook. Then we meet together to sing and greet our classmates. The theme of the day will be explored as we sing, dance, play, act-out, and listen together. Finally, we always end class with our marching band and good-bye song. It is an action packed 50 minute class!
To register, visit http://lamorindatheatreacademy.com/Mommy_and_Me.html
Where: Lamorinda Theatre Academy, Lafayette CA
When: Mondays, February 3 - April 7, 2014 (8 week session)
9:30-10:20 OR 10:30-11:20
Cost: $150 material fee included
Sunday, December 15, 2013
Pony Bead Snowflake
Supplies: 3 pipe cleaners per child
36 pony beads per child - any color combination

Find the center of each pipe cleaner and twist them together so you have six points.
Put six beads on each section
Then twist the end of each around your finger to keep the beads in place.
Shape and place on tree or hang in your window.
Thursday, December 5, 2013
Easy Ornament
Easy, cute, inexpensive and a product to be proud of when your little one is finished! Depending on the age of your kids, you can make the frame or let them make it. All you need is craft sticks (I found them at the Dollar Tree), craft glue, items to decorate, and a ribbon so you can hang on the tree. Adding a photo is optional. Don't forget to write name and date on the back. I did this project with 18 month olds up to age six and they all were successful and all turned out cute! Have fun!!!Wednesday, November 28, 2012
Homemade Ornaments Option #1
Recipe: yields about 20 ornaments
2 cups baking soda
1 cup cornstarch
1 1/4 cup water
| 1st xmas |
| Add ingredients and stir constantly |
| When it looks like mashed potatoes - cool with damp cloth covering it |
| Roll it out on a surface lightly dusted with cornstarch to about 1/4 inch, cookie cutter and stamp (optional), make hole for ribbon |
Ready to play...done crafting!
|
Wednesday, February 8, 2012
Love Bug
| WORK IN PROGRESS... |
You've Been Bitten By MY Love Bug. Happy Valentine's Day!
| Love Bug Assembly Line |
| First 2 completed and drying in the sun. |
Tuesday, February 7, 2012
In time for Valentine's Day
Today was my son's preschool teacher 1/2 birthday and the class had a little celebration to let her know how much she is appreciated and loved. Each child brought in a special card to hand her. Needless to say, the teacher was touched by their kindness.
This card could be used for Valentine's Day, grandparents and anyone we love!
Supplies: red non-toxic paint, paint brush, white and red paper, and WET WIPES
Directions: Pour some red paint on a paper plate and paint child's hand, one at a time. Wipe hands immediately. Once paint has dried, cut out in a heart shape, leaving a white border so you can write a special message around the edge. Then glue on red paper and cut around in a heart shape again.
This card could be used for Valentine's Day, grandparents and anyone we love!
Supplies: red non-toxic paint, paint brush, white and red paper, and WET WIPES
Directions: Pour some red paint on a paper plate and paint child's hand, one at a time. Wipe hands immediately. Once paint has dried, cut out in a heart shape, leaving a white border so you can write a special message around the edge. Then glue on red paper and cut around in a heart shape again.
Sunday, January 22, 2012
Favorite ACTIVE Activities to do on a Rainy Day
The clock seems to move ever so slowly on those cold, winter days where everyone is anxious to get outside and play. Here are three of my favorite indoor activities that are fun, safe and get you moving with the kids.
1. Snowball Fight - Take tissue paper, paper towels or toilet paper and make balls. Then away you go...have fun throwing the balls at each other. You can even move a bed out a bit to hide behind for safety from flying snowballs.
2. Ice Skating - Put on some classical music and grab some paper plates. Stand on the paper plates and start sliding your feet across the floor. It is fun to hold your child's hands and slide them around.
3. Balloon Pass - Blow up a balloon and start passing and catching it. Try counting how many times you can bounce it off your head?
The best part about these activities is that no one or nothing can get hurt. It is a great way to break up the usual play activities. Have Fun!
1. Snowball Fight - Take tissue paper, paper towels or toilet paper and make balls. Then away you go...have fun throwing the balls at each other. You can even move a bed out a bit to hide behind for safety from flying snowballs.
2. Ice Skating - Put on some classical music and grab some paper plates. Stand on the paper plates and start sliding your feet across the floor. It is fun to hold your child's hands and slide them around.
3. Balloon Pass - Blow up a balloon and start passing and catching it. Try counting how many times you can bounce it off your head?
The best part about these activities is that no one or nothing can get hurt. It is a great way to break up the usual play activities. Have Fun!
Saturday, January 7, 2012
Snowman Mobile
Supplies: white construction paper cut into circles, 2 identical hats (color your choice), yarn or ribbon, glue and markers or crayons
Directions: Decide how many circles you want for your snowman. I made it long enough for each circle to be a letter of the child's name. Once it is done it will spell out their name OR you can just decorate it as you wish and add buttons and other fun details.
| Step One: Line up snowman and apply glue. |
| Step Two: Place yarn or ribbon onto glue and MATCH up the other circles and hat. |
| Step 3: Decorate your snowman. |
Thursday, December 15, 2011
Etiquette: Thank you Notes and Kids
| Even Santa writes Thank You notes! |
My mom always has a thank you note in the mail within days of receiving a gift. I am always amazed but know how much she appreciates any token of love given to her. I remember as a child having to write thank you notes with my brothers after Christmas. It was not my most favorite day, but looking back I am so glad my mom made us write them. Now that I am the mom, there are a few ways I think I can make it a little less painful for all involved.
Type of Cards:
Photo cards: Take one of your favorite holiday photos and turn them into personalized note cards. You can make your own by printing out your photo and gluing them on paper or go to any online photo store and upload your photo to create your cards. (www.shutterfly.com , www.cvsphoto.com)
Child Creations: If your child likes to draw, let them draw the front of the card. If they have a lot of thank you notes to write, you can scan the art and print additional cards.
Store Bought: Let your child pick out their own stationary
What to say: Thank the gift giver for the particular gift and tell them why or how it is appreciated, even if it is not the “best” gift. Mention something special about Christmas and wish them a Nappy New Year. Keep it simple!
Young Children: Adults can write the letter by asking their children about the gift and why they like it. This is a good time to model writing with your children and teach beginning sounds. You can have them “write”/scribble their names.
Writers: Encourage your child to write what they can or even do a fill-in the blank type card.
Let you children take part in putting on the stamp, putting stickers on the envelops or walking them out to the mailbox. Tell them how happy the receiver will be when they get their special note in the mail.
Thank you for reading this and I hope you and your children have fun writing your Thank You notes together.
Thursday, December 8, 2011
Photo Gifts
This project is for the moms. These were my "crafty" Christmas gifts for my family last year.
Basic Directions:
1. Cut or buy a wood block from your local craft store the size you want
2. Paint sides that will not have a photo
3. While drying, choose your photos. You may print off your computer using cardstock or photo paper. Trim photos to fit the sides of your block
4. Mod Podge your photos onto the blocks. Paint onto the block first, place photo, then Mod Podge onto of photo.
* For the ornaments, I used 4 photos to go around the block. Then used a staple gun to attach a mini bow on the top of the block. Finally, tie a piece of ribbon through the bow and write the year on the bottom. I thought this would be a great ornament to do each year of your children. You can pick 4 of your favorite photos of your child from the year. What a great way to look back at your child's growth.
*The larger blocks (2 1/2 inch) were for my parents. Each block represented one of their children (3) and their family. The fourth block included everyone's wedding photo and grandchildren altogether. The top of each block I printed out a family photo with a typed verse on it. This is something they can keep out all year.
Tuesday, December 6, 2011
Come Light the Menorah!
Here is a simple hanpdprint menorah that you can make with your child. You may use giant washable ink pads or paint. Paint hands blue and press on paper, one at a time. Have the thumbs touching. Then paint thumb yellow and press above each finger for the flame. You may use glitter to make it sparkle.
*Hanukkah begins at sunset on Tuesday, December 20, 2011, and ends at sunset on Wednesday, December 28, 2011.
*What is a Menorah?
The Menorah is one of the oldest symbols of the Jewish faith. It is a candelabrum with seven candle holders displayed in Jewish synagogues. It symbolises the burning bush as seen by Moses on Mount Sinai. The two most common menorahs have seven and nine candle-holders. The term hanukiah or chanukiah, refers to the nine-candled holder used during the Jewish festival of Hanukkah.
*Hanukkah begins at sunset on Tuesday, December 20, 2011, and ends at sunset on Wednesday, December 28, 2011.
*What is a Menorah?
Friday, December 2, 2011
Handy Christmas Crafts to be Treasured
All the crafts need washable acrylic paint, sponge paint brushes, cardstock, glue and markers for details. Colors depend on the craft. Materials can be purchased at Michaels' Craft Store. http://www.michaels.com/ Don't forget to have handy wipes ready!!
1. Santa Handprint: Paint red on the tip of your child's thumb and across the top of your child's palm. Paint the fingers and rest of the palm white. Press down on cardstock. Repeat if you are making more that one. Once dried, add details. Glue a cotton ball at the end of the thumb for Santa's hat.
2. Angel: Paint bottom of your child's foot white, have them stand and press on cardstock. Then paint both hands white and press on either side of the footprint. Once dried, add halo and face details. This is great framed for grandma.
3. Rudolph: Cut out a brown triangle and glue on cardstock. You may use hands or feet for the antlers. Found it easier to paint infants feet than hands. Paint hands (or feet) brown and press on the top corners of the triangle. Once dried, add details.
I hope this inspires you to get creative and have fun this Holiday Season with your kids.
Sunday, January 30, 2011
Snowflakes
Here are just a few fun things to do with snowflakes
1. Cut snowflakes out of coffee filters and let your kids color or paint them
2. Paint your child's hand white and put down on blue paper to create a snowflake.
3. Snowball Fight! Take white tissue paper or white copy paper and crumple them up. Then toss around or at each other. Let the fun begin! You can also write a letter on the paper before your crumple up. After the few tosses, call out a letter and have the kids see if they have the special snowball.
1. Cut snowflakes out of coffee filters and let your kids color or paint them
2. Paint your child's hand white and put down on blue paper to create a snowflake.
3. Snowball Fight! Take white tissue paper or white copy paper and crumple them up. Then toss around or at each other. Let the fun begin! You can also write a letter on the paper before your crumple up. After the few tosses, call out a letter and have the kids see if they have the special snowball.
Mittens
There are so many fun activities to do with mittens
1. Matching mittens - cut out paper pairs of mittens using different colors and sizes. Have your child match and count the pairs. Talk about which ones are small, medium or large. You can also practice rhyme. "This mitten rhymes with mellow, can you find the _____ (yellow)."
2. After matching, have them paint the mittens. For kids who are older, you can talk about symmetry.
3. Read Three Little Kittens or The Mitten by Jan Bret
There are lots of ideas and activities on Jan Bret's website.http://www.janbrett.com/put_the_animals_in_the_mitten.htm
1. Matching mittens - cut out paper pairs of mittens using different colors and sizes. Have your child match and count the pairs. Talk about which ones are small, medium or large. You can also practice rhyme. "This mitten rhymes with mellow, can you find the _____ (yellow)."
2. After matching, have them paint the mittens. For kids who are older, you can talk about symmetry.
3. Read Three Little Kittens or The Mitten by Jan Bret
There are lots of ideas and activities on Jan Bret's website.http://www.janbrett.com/put_the_animals_in_the_mitten.htm
Thursday, December 16, 2010
Unique Rudolph - Work of Art
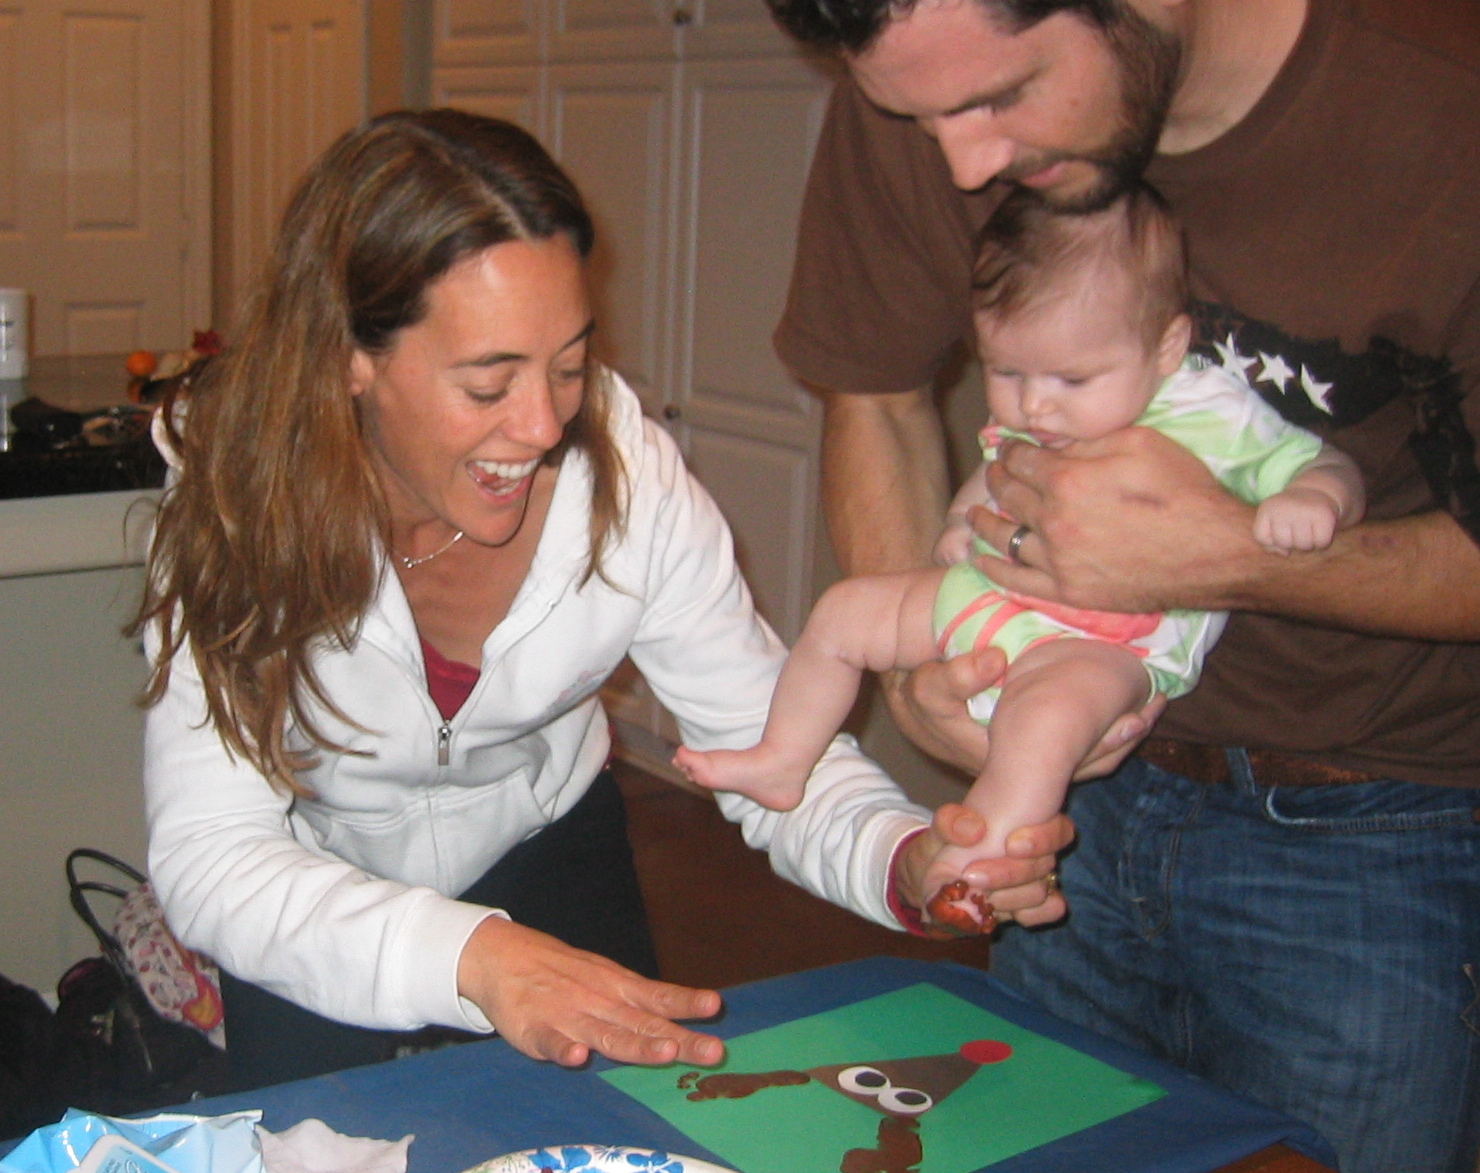
This piece of holiday art will fit in an 11x14 frame. Perfect to take out each Christmas to see your child's sweet little antler hands and fingerprints as the "Christmas lights" on the matte.
Cut a piece of green paper to 8x10. Rudolph is made from a brown triangle, 2 medium white and 2 small black circles for the eyes and one red circle nose. Once glued on the bottom of the page, paint each hand brown for the antlers.
For the matte, I bought an 11x14 cream colored matte from Wal Mart found in the picture frame section. Use Elmer's glue to make a wavy line go around the matte. Place green yarn onto the glue to create the "string" for the lights. The kids use their fingertips dipped in red and green paint to make the "Christmas lights". They all turned out so cute and were so proud of their art! Merry Christmas!!!
Cut a piece of green paper to 8x10. Rudolph is made from a brown triangle, 2 medium white and 2 small black circles for the eyes and one red circle nose. Once glued on the bottom of the page, paint each hand brown for the antlers.
| Footprints with 3 month old Isla! |
Wednesday, December 15, 2010
Edible Christmas Trees
These trees are fun to make and delicious for kids of all ages! Supplies needed: white icing, green food coloring, cone shaped ice cream cones, small candies to decorate as ornaments, coconut and animal crackers.
Mix the white icing with a few drops of the green food coloring. Put some icing on child's paper plate and place the cone upside down in the icing. Now your kids can start decorating. Use a plastic knife or popsicle stick to spread the icing all over the ice cream cone. Then press the small candies all around the green tree. Sprinkle coconut to look like snow. Finally, place animal cookies around the plate using icing to hold them up.
Look at those smiles! This is also a great activity to do at the park as a holiday get-together. You can have your guests bring one wrapped Christmas book and do a book gift exchange. Don't forget to bring coffee for the moms!
Mix the white icing with a few drops of the green food coloring. Put some icing on child's paper plate and place the cone upside down in the icing. Now your kids can start decorating. Use a plastic knife or popsicle stick to spread the icing all over the ice cream cone. Then press the small candies all around the green tree. Sprinkle coconut to look like snow. Finally, place animal cookies around the plate using icing to hold them up.
Look at those smiles! This is also a great activity to do at the park as a holiday get-together. You can have your guests bring one wrapped Christmas book and do a book gift exchange. Don't forget to bring coffee for the moms!
Subscribe to:
Posts (Atom)