Sunday, December 15, 2013

Pony Bead Snowflake

Supplies: 3 pipe cleaners per child
36 pony beads per child - any color combination

Find the center of each pipe cleaner and twist them together so you have six points.
Put six beads on each section
Then twist the end of each around your finger to keep the beads in place. 
Shape and place on tree or hang in your window. 

Monday, December 9, 2013

My Angel

One of my favorite activities to do with young kids is to sing Angel Band.  Each child wears a halo and is given an instrument.  To make the halo, take tinsel and wrap around to fit their head and twist the ends.  Each child plays their instrument and sings when their number is called (1-10) and keeps playing until the end.  Can get noisy, but they look soooo cute!

There was one, there were two, there were three little angels.
There were four, there were five, there were six little angels.
There were seven, there were eight, there were nine little angels.
Ten little angels in our band.
Ohhh, wasn't that a band, Christmas morning, Christmas morning, Christmas morning.
Wasn't that a band, Christmas morning, Christmas morning, Christmas morning.
Christmas morning band.

I took their photo wearing their halo and used it to make their own angel using white paint for their handprints.  You can cut out and use as an ornament or frame their angelic creation.

Thursday, December 5, 2013

Jingle Bells craft


I used these jingle bells to sing Jingle Bells, Angel Band http://mrsodaniels.blogspot.com/2013/12/my-angel.html  and Ring Those Bells.

Ring Those Bells (Tune: Jimmy Crack Corn)
Ring those bells and turn around,
Ring those bells and turn around for Christmas time has come.
*Stomp your feet, jump up high, etc...
Great song for getting the wiggles out!

Easy Ornament


Easy, cute, inexpensive and a product  to be proud of when your little one is finished!  Depending on the age of your kids, you can make the frame or let them make it. All you need is craft sticks (I found them at the Dollar Tree), craft glue, items to decorate, and a ribbon so you can hang on the tree. Adding a photo is optional. Don't forget to write name and date on the back. I did this project with 18 month olds up to age six and they all were successful and all turned out cute!  Have fun!!!


Monday, December 2, 2013

And so it begins...Elf on the Shelf!

I was never a fan of Elf on the Shelf.  Why do I need to "bribe" my son to be good for Santa...shouldn't he be good everyday?  I was hoping to get away with not doing it, but after a play date yesterday, my son asked if an Elf could come to our house too!  I asked him if he was "up for the challenge" of being good because the Elf reports back to Santa daily.  He said with gusto, "I'm Ready!"  So before bed we wrote the Elf a note and left him a cookie.  Luckily, I had an "elf" tucked away in our Christmas decorations, and thought he would do.  That next morning, at the crack of dawn, my son was up looking for the Elf.  And so it begins, we are now apart of the "Elf on the Shelf" craze.


* I am going to use this opportunity for my son to practice "writing" by leaving notes to the Elf.  

Sunday, November 17, 2013

Holiday Express Mommy and ME

TWO extra special Mommy and ME Classes in December
It is the perfect way to get into the Holiday Spirit as you and your child create Holiday crafts (ornaments, cards and decorations) and ring some Jingle Bells as we sing/play our favorite Christmas songs. 


When:  December 2 & 9 from 9:30-10:20
Where: Lamorinda Theatre Academy, Lafayette, CA

Register TODAY: http://www.lamorindatheatreacademy.com/Mommy_and_Me.html


If Mondays are not good for you, let me know.  We can arrange another day for you and some of your friends at your home or park.

Saturday, November 16, 2013

A Thankful Heart is a Happy Heart - Gratitude Journal

Last Thanksgiving we spent the day with friends.  I wanted to bring a meaningful gift to show our thanks and appreciation for inviting us to their family celebration.  I found a "Fall" looking journal and inscribed a special message.  Each person wrote in the journal what they were thankful for.  The young ones drew a picture.  I told the host to put the journal away with the Thanksgiving decorations so that every year your guests can write in the journal.
This year my family will be starting this tradition.  I ordered a notebook on Shutterfly which included my favorite family pictures.  It will be fun to look back every year to see who was at our Thanksgiving, what they were thankful for and to see their handwriting.  Nowadays most notes are emailed or printed.  Hand written notes are always treasured.
Wishing you many blessing this Thanksgiving with your family and friends!


Sunday, November 3, 2013

Thankful

I can't believe that tomorrow is the final Fall Mommy and ME class.  I feel so THANKFUL that I am able to plan and teach these classes.  The giggles and smiles from the students AND their moms are priceless!  Thank you for sharing your Mondays with me.
Final pages to their memory book

See you in December:
http://www.lamorindatheatreacademy.com/Mommy_and_Me.html


Saturday, November 2, 2013

YEAH for Arts and Crafts

Never too late to post a Halloween project.  Getting my five year old to "do crafts" with me has never been his favorite thing.  However, he had fun adding the stitches and using the silver permanent marker.  Here is my one and five year old footprint.  Definitely, a keeper!

After reading this article, Arts and Crafts in Childhood Predict Innovation and Entrepreneurship in Adulthood, I hope my son will thank me when he grows up.    http://www.parents.com/blogs/red-hot-parenting/2013/10/31/health/arts-and-crafts-in-childhood-predict-innovation-and-entrepreneurship-in-adulthood/

Monday, October 28, 2013

Halloween Fun

OK...I am "that" mom.  I thought it would be fun to have a few boys over for some Halloween fun, which included apple munch, spooky dinner and a scavenger hunt.  (I realized that hanging an apple from a string is a great way to get my son to eat apples.  He has been asking for more hanging apples!)  Dinner consisted of grapes on a stick (in a pattern, of course), mummy dogs and/or ghost shaped sandwich, veggie sticks and tomatoes. The drink was red "blood" punch.  They ate outside in candlelight.  After dinner the doorbell rang and the scavenger hunt began with clues and mini lights for each of the boys.  I made up rhyming clues that had the kids go to the neighbors asking for more clues.  They had a blast!
Ninja Pose after the Hunt
I found some eyeball treats at the store and made rhyming clues to go with them.  Have fun making up your own clues.  They are silly but the boys loved it!
Here are my clues...

1.  My eyes have been watching you...Here is a little light to help find
your way tonight. (mini finger lights)  Listen closely to clue number #1 and let us begin a little fun.  I am no longer here, and away I flew to a house that has a one and a ... two.


2.  In case you get in a little trouble, I have for you an eyeball...bubble. (eyeball bubbles)
You need to use your eyes to find another prize. Carefully head next door, if you want to find out...more!


3.  We don’t want to hear any moans, when we give you a bag of...bones.(bone candy)
Now, use your feet and carefully walk across the... street.


4. You deserve something sweet.  Here is a little eyeball... treat.  (chocolate eyeballs)
For your final clue tonight, you will get one last light.
You made it my house number 7, now it’s time to head back to house #...11! (light-up bouncy balls)


The boys ran from house to house, so excited to get the next clue!

Sunday, October 20, 2013

Fun Fall Songs Part 2

Here are a few more songs to enjoy this Fall with your little ones...
Be sure to register today for the Holiday Express Class - 2 special classes in December where we will be making ornaments and gifts to be treasured and singing Holiday favorites!

Saturday, October 19, 2013

The Chocolate Chip Ghost

"Something dreadful has happened!"
This was one of my favorite stories growing up and I had to make this for my Mommy and Me class and share with my own boys...I found this version online, but you can improvise when you retell the story.  I cut out one mommy ghost and 5 smaller ghosts - one side white and glued another color on the back.  When I tell the story, I flip over the ghosts.  (It is fun to enjoy some chocolate chip ghost cookies at the end!)
Mommy ghost and her 5 white ghosts


Once upon a time, there lived 5 little ghosts and a Mama ghost. As everyone knows, ghosts are white.  The only thing they can eat is vanilla ice cream and the only thing that they can drink is milk. One day when Mama ghost went to the refrigerator, there was no vanilla ice cream and no milk. So she had to go to the grocery store and before she left she said, “No matter how hungry you get, do not eat  anything or something dreadful will happen.” The first ghost became so thirsty and he looked in the refrigerator and saw a little glass of grape juice and thought, “just one teeny sip wouldn’t hurt.” So he took a one teeny sip of grape juice and what do you think happened? He turned purple! The other ghosts looked at him and said “Mama told us that something dreadful would happen and she was right.”  The second ghost became so hungry and he looked in the refrigerator and saw an orange and thought, “just one teeny bite wouldn’t hurt.” So he took a one teeny bite of the orange and what do you think happened? He turned orange! The other ghosts looked at him and said “Mama told us that something dreadful would happen and she was right.”  The third ghost became so hungry and he looked in the refrigerator and saw a banana and thought, “just one teeny bite wouldn’t hurt.” So he took a one teeny bite of spinach and what do you think happened? He turned yellow! The other ghosts looked at him and said “Mama told us that something dreadful would happen and she was right.” The fourth ghost became so hungry and he looked in the refrigerator and saw a bowl of strawberries and thought, “just one teeny bite wouldn’t hurt.” So he took a one teeny bite of a strawberry and what do you think happened? He turned red! The other ghosts looked at him and said “Mama told us that something dreadful would happen and she was right.”  The fifth ghost said, “I’m so hungry but I will not do what my brothers did.  I’ll look in the freezer and see if there is just maybe a little vanilla ice cream left.”  When he looked in the freezer there was some ice cream and it was almost vanilla – it was white with little brown pieces of chocolate in it. So the ghost said, “This shouldn’t hurt me – those pieces of  chocolate are so tiny.” So he ate one spoonful and became a chocolate chip ghost! They were all so scared of getting in trouble they hid behind the door! When Mama ghost returned, she knew something was wrong when she didn’t see her children, so she started looking for the little ghosts. When she found all of them, she said, “Little ghosts, I told you that something dreadful would happen and it did.” Whatever can we do to get you white again for Halloween? She called the ghost doctor and this is  what he told her to do. Keep all the little ghosts in bed for five days and give them nothing but vanilla  ice cream and milk and they should be ready for Halloween. So that is what she did and by Halloween night, the five little ghosts were all white again to go out haunting and spooking and shouting “BOO!” And they never again ate something they shouldn’t.
*There are so many versions of this story, you can have the ghosts go hide behind something, have a different number of ghosts or have them eating different kinds of food.

Monday, September 30, 2013

Brown Squirrel - Getting Ready for Winter

Brown Squirrel, brown squirrel, swish your bushy tail!  Time to start collecting acorns and get ready for winter...or at least have fun exploring squirrels!

Here are a few fun activities to do with your little ones:
*Get outside and look for squirrels, acorns and Fall leaves.
*Collect acorns, count and sort them
*Make a squirrel and sing a song - directions: http://mrsodaniels.blogspot.com/2010/11/nuts-about-you.html
*Bring a paper squirrel and bag of nuts to your teacher or grandparent "I am NUTS about you!"

Monday, September 23, 2013

Apple Stamping

This was the apple project we did in my Mommy and Me class.  I liked it because it was a perfect project for kids between the ages of 18 months and 3 years old.  Easy and cute.  My five year old had fun making one too!  HOWEVER, do not try this with a one year old.  My son picked up the apple on the stick and tried eating it!  Ended up with a mouthful of paint...oops!  He was definitely interested in eating the apple - not crafting with it.

Took a few bites before we even got started!
Cut apples in half, stick popsicle stick in each end and dip in paint.  Ready to stamp!


Friday, September 20, 2013

New Favorite Article

There are so many rewarding moments we experience with our kids.  We are so blessed as moms to be able to watch our children learn and grow, as well as our husbands!  :)  Enjoy this article that was sent to me by another mom.   I felt that I needed to share it with my friends and other moms.  It is a must read! 
http://www.huffingtonpost.com/rachel-macy-stafford/six-words-you-should-say-today_b_3863643.html
I love...


Tuesday, September 17, 2013

Favorite Fall Songs and Poems - PART ONE

Here are just a few of my favorite Fall songs and poems.  I always like to find the songs that get the kids up and moving.  For the Autumn Leaves are Fall Down, go outside and use real leaves while you are singing the song.  Kids LOVE raking leaves!  They can throw, jump, roll, and dance in the leaves.

Saturday, September 14, 2013

Mustash Bash -

It is hard to believe that my "little man" just turned one - probably the reason I have not made many posts.  So I hope you enjoy these photos of our party.  It was simple and fun.  A big thanks to Gigi for being there to help too!
Some of the activities included: bubbles, pin the mustache on the birthday boy, ball pit, and silly photos.

Party details: chocolate mustache party favor, center pieces with mustaches, homemade blueberry smash cake, and chocolate toppers for the cupcakes.
Happy Birthday to our little man...we love you!

now back to reality...Fall activities coming soon. 

Here is a funny article to remind us parents to keep things in perspective! http://wellcommons.com/weblogs/larryvillemom/2013/aug/21/5-ways-were-making-parenting-harder/

Here is the mustashe pattern used for the chocolate cupcake toppers and cut outs for "pin the mustache on the birthday boy".  I went to Costco, printed a 16x20 photo, and the kids taped the mustache on the photo.

Sunday, September 1, 2013

September Apple Tree

September Apple Tree

September's "Handy" Treasure!  They can be done with any age and make great keepsakes to show your child’s growth or gifts to send to the grandparents.  You can make these crafts by tracing, painting, or pressing your hands.  If your child does not like to get their hands painted, try tracing their hand instead.  If you have a little one, paint their foot instead of their hand.  

September - Apple Tree
Supplies: brown paper, scissors, glue stick, green and red washable paint, paint or sponge brush, paper plate, white construction paper, and wet wipes
Supplies can be purchased at Michael’s Craft Store

Directions:  I always put down an old plastic table cloth left over from a birthday party as our work space.  Trace and cut out a tree trunk from the brown construction.  If your child is old enough, have them do the cutting.  Glue down on the white construction paper.  Pour green paint on a paper plate and have your child press or paint their hand and put on the paper as the leaves.  Repeat and repaint when necessary.  For a younger child, paint their foot.  Once dry, use the red paint to make apples on the tree using their thumb.  Be sure to write their name and date on the art work.

Remember...Mommy and Me starts Monday, September 9!  Sign Up TODAY!
http://mrsodaniels.blogspot.com/2013/07/fun-fall-schedule.html

Thursday, August 22, 2013

MORE Ideas...Countdown to Kindergarten

Countdown to Kindergarten

This is an exciting time for both students and parents.  You play the most important role in getting your child off to a good start in kindergarten. Children love to learn. Be sure to give your child plenty of praise and encouragement without pressure. Remember that children learn best through "hands-on" activities and participation. Here are a few activities that you can do at home to help your child prepare for that First Day of Kindergarten.  Enjoy the journey together!


*I-Spy - This game can be done anywhere: the car, the dinner table, the park, the doctor's office and can be fun for all students.  You can "spy" for letters, beginning sounds, rhyming words, numbers, shapes, colors, etc.


*Rainbow Write - Have your child trace pre-written words many times using a different color.  REMEMBER to START YOUR LETTERS AT THE TOP!


*Environmental Print - Cut out and glue words that your child can read on a poster.  This includes popular logos, restaurant names, etc.


*Sorting and Patterning- These are valuable skills.  Be sure to have your child explain their reasoning.


*Name Puzzle - Cut out their name or important words and have our child put them in the correct order.


*Back Writing Letters and Numbers - Need some relaxing time...practice letters, numbers, or words by "writing" with your fingertips on someone's back and have them guess that you wrote.


*Concepts of Print - Show and tell how to use a book correctly, tracking from left to right and use your finger to point to the words as you read.  Spend time looking at the book to look for the title, how many words or letters on this page, where is the front of the book, and rhyming words.


*Create a book together.  Making books or writing a story even by drawing pictures helps your child practice reading, writing, listening and speaking. These are important skills for success in school.


*TALK to your child about what they see, what they do and what they are thinking about.


*READ, READ, READ - Set a good example by encouraging a love of stories and books!  AND visit the library!


Saturday, August 17, 2013

Countdown to Kindergarten

Countdown to Kindergarten

Tomorrow marks - 10 days until school begins.  Make a paper chain to help countdown to the big day!  Tear off one link each day.
Make pattern, write numbers, ...
then, staple together to make chain


Here are some things you can do to prepare for that first day:
*adjust your body clock to fit your new school schedule
*talk about healthy choices for lunch/snack
*make sure your name is on your backpack and lunch box
*check supply list
*find your classroom and playground
*say your new teacher's name 3 times (when you find out)
*discuss drop-off and pick-up procedures
*pick out your first day outfit
*don't forget to take a first day of school picture
*SMILE and have a great day!


For more fun first day of school ideas, check out: http://mrsodaniels.blogspot.com/search/label/first%20day%20of%20school

Thursday, May 30, 2013

ABC Puzzles

 I suppose you could go to Lakeshore Learning and purchase something like this, but I chose to make this ABC puzzle.  Using sentence strips, I wrote the alphabet, Capital A then lower case a from A-Z leaving a small amount of space between each letter.  Then I cut a squiggly lines between each letter.  I used regular and fun shaped scissors to get different cuts.

Initially, I gave my son the letters A-G and had him put the matching letters together.  I didn't want him to get overwhelmed by the whole alphabet.  It was interesting to see his thought process.  He checked each pair to make sure they were a match and would sing the ABC song to figure out what letter came next.  When he was successful with the first set of letters, I asked him if he was ready for more of a challenge.  He was ready!  When he was finished, we sang the ABC song as he pointed to the letters and we counted to see how many letters make up the alphabet.  Doing this activity, I realized that he still skips the letter Nn when saying the alphabet.  This allowed us to slow down and look at each letter as he sang the song.

*For younger kids, only start off with a few letters and build.  For older kids, you could make puzzles for practicing names and sight words.

Kindergarten Readiness Workshops Information:  http://www.blogger.com/blogger.g?blogID=5912000420279799351#editor/target=post;postID=2253512591600044146;onPublishedMenu=allposts;onClosedMenu=allposts;postNum=5;src=postname

Have fun!

Wednesday, May 22, 2013

NAME Cheer

Our names are special, our names are unique.  There is a sense of pride when your child learns to spell their name.  I started "cheering" my son's name from day one.  I had a framed picture above his changing table and I would cheer his name all the time. 
Cheer:  S-H-A-Y, Go Shay Go, Go Shay Go, GOOOOOOO Shay!
As he got older, I moved the picture so it faced the toilet.  As he was potty training and spending some time there, he started "cheering" his name.  Then, when people asked him his name, he would spell it first, then say his name.  He was so proud of himself and people were impressed when they saw this little boy spell out his name.  After years of his first name, we moved to his last name.  It is a bit longer, so I had to get creative and find a way that would teach him the spelling.  That's when I found a tune and changed the words to the letters in his name.  In the video below is Shay at age 5, but he learned the song when he turned four and still loves to sing his name!

Anyone can cheer or sing their name.  You just have to find a tune that works.  Here is what I have come up with so far.
3 letter names: The tune of 3 blind mice (B-E-N, B-E-N, Ben is my name)
4 letter names: Spell out the letters for a cheer (see picture above)
5 letter names: The tune of BINGO (There was a boy/girl who had a name and ____was his name-o)
6 letter names: The Mickey Mouse song (H-U-N,T-E-R, Hunter is my name)
7 letter names: The tune of BINGO again, but start right out with the spelling (J-A-C-K-S-O-N and Jackson is my name-o)
8 letter names: The tune of Joy to the World (see video)
9 letter names:  (Sorry Francesca, Auntie is still thinking of a song...stay tuned!)
 
In the beginning it is important to have your child see their name written as they sing their name.  You can write it on a plain piece of paper and have your child decorate it or glue pictures of themselves around it.  I wrote the name on a piece of paper and also on post-it notes.  My son had to cover the letters with the post-it notes.  See this post for reasons why I love post-it notes. http://mrsodaniels.blogspot.com/2011/08/post-it-notes-why-i-love-them.html

Have fun and let me know how it worked with your kids!  They will love singing and cheering their name!!!

*Find out about Kindergarten Readiness Workshops: 

Monday, May 20, 2013

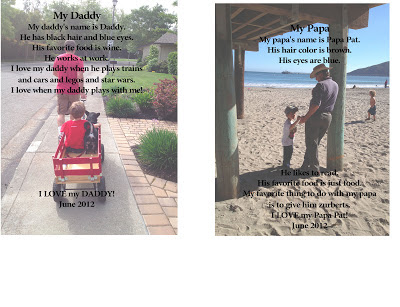
Father's Day Gift Idea

Mother's Day and Teacher Appreciation are behind us and yet another holiday will be here before we know it.  As I write this, I initially thought this would be a Father's Day gift idea....however you could do this for an end of year gift for your teacher or save for another loved one.

I asked my son these 5 questions, but you can ask any question you like:
What is your daddy's name?
What color are his eyes and hair?
What does daddy like to do?
What do you like to do with daddy?
Why do you love daddy?

I found a photo of my boys and imported it to Printshop.  I made the opacity of the photo 80% so you can see the text.  Then I typed over the photo the answers to the questions.  Be sure to include the date! I printed it out and inserted it in a frame my son painted.  (I found the wood frame at Michael's Craft Store for $1.)  On the back my son wrote his name and put the date.  This is the one we made last year, but I think I might make it again.  It will be fun to hear how he answers the questions this year.


Saturday, May 4, 2013

Simple Science

I was looking for a way to get the boys out of the sun for a bit and knew it would have to be good to get them away from their Hot Wheels dirt track.

I brought the supplies outside to them:
1 cupcake pan
2 spoons
different colors of food coloring
a bottle of vinegar
a container of baking soda
2 cups for pouring vinegar

They were a bit hesitant at first, but there were curious and ready to give the experiment a try.
Put 2-4 drops of food coloring in each cupcake holder.  The boys could mix colors.   Then put a spoonful on baking soda on top of the food coloring

I poured the vinegar in their cups.  Then at the same time they poured it into one of the cupcake holders.  They were so excited to see what happened.  The colors appeared and they loved the sound of the fizz.  We kept going until all the vinegar and baking soda was gone!


There are many variations to this experiment but it was a success!  I prefer to use a cupcake pan rather than individual cups because the cups can tip over.  Don't forget to use your senses: smell the vinegar, obsereve the changes of color, listen to the fizz.  The boys had fun.  "This is so awesome!" and "Science is so cool!"
I guess I will have to head back to the Dollar Store to stock up on more vinegar and baking soda!
Have Fun!

Wednesday, March 27, 2013

Smart Eggs

Mommy and Me starts April 14, 2014 at the Lamorinda Theatre Academy
http://www.lamorindatheatreacademy.com/Mommy_and_Me.html
Smart Eggs

Looking for a way to use all those plastic Easter Eggs?  Here are three ways you can use them to teach letters, numbers and rhyming!  TIP:  Use plastic eggs that are easy to twist or open and close.  It can be frustrating when it is difficult to put them together.  You want to make this is a fun and independent activity!
Use a Sharpie to write on the egg.  For rhyming, write the first letter on one half and the rime on the other half.  Twist egg to create different words! For letters and numbers, have your child match the correct answers.

Another egg-cellent idea...practice basic addition and/or subtraction fact families.  Turn the egg vertically and write sum on the bottom half of the egg and on the top write the different problems that add up to the sum.  Now twist the egg to see the various ways to get the answer.  Inside have 4 jellybeans.  Your child can visually make the problems.  For example: if the sum is 4, write 0 + 4, 4 + 0, 1 + 3, 3 + 1, 2 + 2 around the egg.  Hope this makes sense...this idea came to me at 4am as I was feeding my baby.  :)

Check out this post for more fun ideas using plastic Easter eggs: http://mrsodaniels.blogspot.com/2010/03/what-to-do-with-all-plastic-easter-eggs.html

Monday, March 11, 2013

Leprechauns Have Arrived!


Looking in the tall grass
Today we found evidence that the leprechauns have arrived in Moraga!  In fact, we must have been close because they left behind their hats and some gold coins. The silly leprechaun left a trail of gold coins (yellow circles cut from construction paper), which we had to follow.  Along the way we came across foot prints, wild turkey, trash, and clovers - lots and lots of clovers.  However, we did not find the lucky four leaf clover.  I have a feeling the next few days we will be looking for those tricky wee leprechauns.
We found their footprints!


Counting the leaves

We found some treasure and their hats!


For more St. Patrick's Day fun, check out some of my past posts.  Look at the Activities on the right and click on St. Patrick's Day.